Baldur’s Gate Enhanced Edition – Local save folder
Posted: 13/04/2017 Filed under: Batch & VBScripts, Games, Windows registry | Tags: baldur's gate 2 enhanced edition, baldur's gate enhanced edition, local save files, portable, symbolic links Leave a commentMake Baldur’s Gate Enhanced edition portable.
The following batch file will create symbolic links to set your save folder to the game folder instead of “My Documents”. This is useful if you intend to play the game portable. For example from a USB stick if you intend to be moving between different computers.
In the original Baldur’s Gate you had your save files in your local path, this is a workaround to make the enhanced edition act the same way.
Instructions
- Move the following files from your “My Documents\Baldur’s Gate – Enhanced Edition” folder into the “Baldur’s Gate – Enhanced Edition” install folder
• Baldur.lua
• characters
• mpsave
• portraits
• save - Copy the following code into your favourite plain text editor or notepad or download it directly by right clicking the following link and selecting “Save link as”
@ECHO OFF FOR /F "tokens=3 delims= " %%G IN ('REG QUERY "HKCU\Software\Microsoft\Windows\CurrentVersion\Explorer\Shell Folders" /v "Personal"') DO (SET MYDOCUMENTS=%%G) mkdir "%MYDOCUMENTS%\Baldur's Gate - Enhanced Edition" rmdir "%MYDOCUMENTS%\Baldur's Gate - Enhanced Edition\portraits" rmdir "%MYDOCUMENTS%\Baldur's Gate - Enhanced Edition\save" rmdir "%MYDOCUMENTS%\Baldur's Gate - Enhanced Edition\characters" rmdir "%MYDOCUMENTS%\Baldur's Gate - Enhanced Edition\mpsave" del "%MYDOCUMENTS%\Baldur's Gate - Enhanced Edition\Baldur.lua" pause mklink /d "%MYDOCUMENTS%\Baldur's Gate - Enhanced Edition\portraits" "%~dp0\portraits" mklink /d "%MYDOCUMENTS%\Baldur's Gate - Enhanced Edition\save" "%~dp0\save" mklink /d "%MYDOCUMENTS%\Baldur's Gate - Enhanced Edition\characters" "%~dp0\characters" mklink /d "%MYDOCUMENTS%\Baldur's Gate - Enhanced Edition\mpsave" "%~dp0\mpsave" mklink "%MYDOCUMENTS%\Baldur's Gate - Enhanced Edition\Baldur.lua" "%~dp0\Baldur.lua" pause - Save it as anything.bat in your Baldur’s Gate Enhanced edition install folder.
- Run anything.bat when the black window says press any key to continue, do so until the window disappears.
- Check that the folders in your “My Documents\Baldur’s Gate – Enhanced Edition” now have a little arrow on their icons. This indicates that they are not the actual files/folders but symbolic links.

- When you move to a new computer run anything.bat again and start the game!
Baldur’s Gate 2 Enhanced editon
Repeat the same steps as above but for the folder “Baldur’s Gate II – Enhanced Edition” and instead copy and paste the following or right click this and select “Save link as”.
@ECHO OFF
FOR /F "tokens=3 delims= " %%G IN ('REG QUERY "HKCU\Software\Microsoft\Windows\CurrentVersion\Explorer\Shell Folders" /v "Personal"') DO (SET MYDOCUMENTS=%%G)
mkdir "%MYDOCUMENTS%\Baldur's Gate II - Enhanced Edition"
rmdir "%MYDOCUMENTS%\Baldur's Gate II - Enhanced Edition\portraits"
rmdir "%MYDOCUMENTS%\Baldur's Gate II - Enhanced Edition\save"
rmdir "%MYDOCUMENTS%\Baldur's Gate II - Enhanced Edition\characters"
rmdir "%MYDOCUMENTS%\Baldur's Gate II - Enhanced Edition\mpsave"
del "%MYDOCUMENTS%\Baldur's Gate II - Enhanced Edition\Baldur.lua"
pause
mklink /d "%MYDOCUMENTS%\Baldur's Gate II - Enhanced Edition\portraits" "%~dp0\portraits"
mklink /d "%MYDOCUMENTS%\Baldur's Gate II - Enhanced Edition\save" "%~dp0\save"
mklink /d "%MYDOCUMENTS%\Baldur's Gate II - Enhanced Edition\characters" "%~dp0\characters"
mklink /d "%MYDOCUMENTS%\Baldur's Gate II - Enhanced Edition\mpsave" "%~dp0\mpsave"
mklink "%MYDOCUMENTS%\Baldur's Gate II - Enhanced Edition\Baldur.lua" "%~dp0\Baldur.lua"
pause
Caveats
May require administrative rights on the computer you’re on.
After moving to another computer you may have to run the installer for the OpenAL codec once.
Robocopy sync multiple folders – to one location – batch script
Posted: 21/06/2016 Filed under: Batch & VBScripts | Tags: bat, batch, multiple folders, one-way sync, portable, robocopy, script, simple, sync folders, syncing, unicode, windows, xcopy 3 CommentsFrom Wikipedia:
This makes it a very useful simple syncing tool. The following is the script that I use to sync my laptop documents when I’m leaving the office. There are a lot of applications and tools for this but sometimes you just want a portable script.
Please note that this is a one-direction sync. It will not change or remove anything from the source folder.
Instructions
- Copy and paste the following batch (*.bat) script into your favourite text editor of choice or notepad. (Not Microsoft word) You can also download it directly from here or here mirror. (You might have to right click and select save destination as)
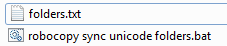
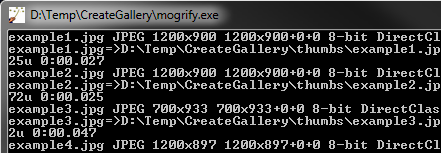
@echo off ::Unicode CHCP 1252 echo %~dp0 ::Remove old log file if exist "%~dp0\robocopylog.txt" del "%~dp0\robocopylog.txt" ::Ignore the following file types. You can add more separated by space set exclude=*.bak *.backup ::Go through each line in the folders.txt file for /f "skip=2 delims=" %%f in ('find /v "" %~dp0\folders.txt') do ( ::Check if the relative path from current directory works if exist "%~dp0\%%f" ( ::Sync relative path robocopy "%%f" "%~dp0\%%f" /v /xf %exclude% /mir /tee /fft /log+:robocopylog.txt ) else ( ::Sync absolute path if relative didnt work robocopy "%%f" "%~dp0\%%~nf" /v /xf %exclude% /mir /tee /fft /log+:robocopylog.txt ) ) ::Wait for keyboard input before closing the window. Remove pause if you want it to close pause - Save it where you want your backups to be stored (destination). Use whichever name you like. For example robocopy sync unicode folders.bat
- Create a new text file named folders.txt using any text editor and enter each folder that you want to make a backup off separated by a line break. (sources) Save the text file in the same folder as the batch script. Relative paths work too. Example:

- Run the script! The black window will stay open when it’s completed.
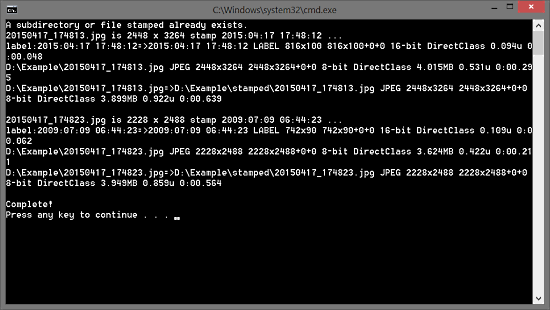
With the above example the result would look something like this:

Notes
- If source folders share the same name, they will be merged. Keep this in mind.
- This is a one-direction only sync. It will not move or remove anything from the source folder.
- If you don’t want the window to stay open when it’s complete remove the last line “pause” from the script.
- A log file is saved for each operation in robocopylog.txt
- You can add more files to exclude if you want, example:
exclude=*.bak *.backup *.mp4 *.avi
VBScript Map Network Drives
Posted: 18/12/2015 Filed under: Batch & VBScripts | Tags: annoying, could not reconnect, map network drives, network drive, network drive error, persistent, popup, system tray, taskbar, windows 7 Leave a commentThis script will silently map specified network drives in the background and retry for a specified number of times with a specified delay before giving up. (Default: 10 retries per second for 120 retries)
You can change this by editing the script and changing:
delay = delay between each retry
timeout = number of retries
Using a batch command would also work but then you would see a black window popping up, hence the vb script.
Why?
In Windows 7 when you’ve mapped persistent network drives they can give error messages depending on different booting priority issues. This is a fairly common problem that doesn’t overall affect the functionality, it just adds an annoying pop up message on startup marking drives over with a red cross.
There are other workarounds that delay network before login or some such but that can cause other issues with services and this workaround was just simpler and quicker for me. This is just one example and with this simple script you can easily get rid of the message.

Instructions
If you already have mapped drives (persistent) you need to disconnect them.
1. First step – Download the file or save the script manually
Right click this link and select save as / save link and download the script (mirror) directly.
OR
Manually copy and paste the following text into your favorite plain text editor or windows notepad (not Microsoft Word) and save the file as MapNetworkDrives.vbs
'This script will silently attempt to map network drives of your chosing and retry doing so for 120 seconds
'If drive letters are already mapped the script will exit
'nirklars.wordpress.com
set shell = wscript.createobject("WScript.shell")
set filesys = CreateObject("Scripting.FileSystemObject")

'Change this to the number of retries you want before giving up
timeout = 120
'Change this to the delay between retries, in milliseconds 1000=1 second
delay = 100

function MapDrive(pathNetwork, driveLetter,loginCred)
	count = 0
	do
		if filesys.DriveExists(driveLetter) or count > timeout then
			'msgbox "Drive exists"
			exit do
		end if
		commandString = shell.ExpandEnvironmentStrings("%WINDIR%") & "\system32\net.exe use " & driveLetter & ": " & pathNetwork & " /p:no " & loginCred
		'InputBox " "," ",commandString
		shell.run(commandString), 0, true
		WScript.Sleep delay
		count = count + 1
	loop
end function

'Copy and paste for each network drive to map
MapDrive "\\netgear\test1","Y","/USER:guest"
MapDrive "\\netgear\test2","Z","/USER:guest"
MapDrive "\\netgear\test3","W","/USER:guest"
2. Second step – Edit the file
Edit the bottom of the file where it says MapDrive. Each line adds another network drive mapping so copy and paste for each drive you want mapped. Example:
MapDrive “\\netgear\test1“,”Y“,”/USER:guest“
This example will map the folder test1 on a NAS server with the network name netgear with the drive letter Y.
3. Third step – Set it to start automatically when booting windows
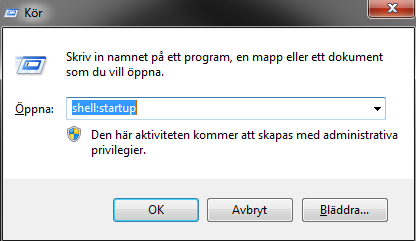
If you’re on Windows 7 you can most probably just place it in your start menu startup folder.
Hold down the windows button and press R and type shell:startup and press enter to quickly open it.
On Windows 8 or more recent you can’t do that. Instead you must schedule a task to run on start up and login to launch the script. See instructions here.
Add scaled timestamps to photos using ImageMagick
Posted: 25/04/2015 Filed under: Batch & VBScripts, Graphics | Tags: adding, command line, configuration, convert, date, editing, imagemagick, images, open source, photo, pictures, scaled, time, timestamp, timestamps, windows 2 CommentsHere is one way to add timestamps quickly to lots of photos using open source tools and a script.
The image editing is done using ImageMagick convert.exe and identify.exe
ImageMagick is a free to use open source collection of command line tools for image editing, identifying, manipulation and much more.

This script will go through all JPG, JPEG, GIF and PNG files inside the current folder, make copies of them in a separate folder and add date and time saved (burned) into the image. The operation is lossy hence it only modifies copies of the files. Date and time is retrieved from the metadata tag Exif.Image.DateTimeOriginal. If the images lack this tag they will be stamped “No timestamp”.
The timestamp font size and placement on the photo will scale in percentage according to the width and resolution of the photo.
If you want to change colors or such you will need to edit the script manually. Here are some examples of photos I’ve taken with added timestamps:


If these kind of timestamps are good enough for you, you’ve found the right post!
Instructions
Option a) – quick
1. Download the script (mirror) together with portable ImageMagick convert.exe and identify.exe
MD5: a5363bef4aafbe979dcac875f7f2e263
2. Extract all files in the folder where you keep the images that you wish to add timestamps to
3. Double click on add timestamps.bat to start the process.
A black window should pop up showing the image conversion process in ImageMagick.
4. When done you should see a folder named stamped with copies of the files with added timestamps!
Option b) – manual
1. Download ImageMagick from the windows portable edition here and place convert.exe and identify.exe in the same directory where you place the script. Alternately you can use the files supplied in the download above.
2. Copy and paste the code from below into your favorite plain text editor like notepad, notepad2 or notepad++
3. Save it with whichever name you prefer as long as you end the name with the file extension .bat for example add timestamps.bat
4. Double click on the bat file to start the process!
Batch script to copy and paste
@echo off & cls
rem enable variables referencing themselves inside loops
SetLocal EnableDelayedExpansion

rem optional settings
set fontcolor=#FFD800
set fontoutlinecolor=#000000
set fontstyle="Arial-Bold"

rem create a new folder where the stamped images will be placed
mkdir stamped

rem loop through all jpg png jpeg and gif files in the current folder
for /f "delims=" %%a in ('dir /b /A:-D /T:C "%cd%\*.jpg" "%cd%\*.png" "%cd%\*.jpeg" "%cd%\*.gif"') do (
	rem retrieve image date and time
	SetLocal EnableDelayedExpansion
	for /f "tokens=1-2" %%i in ('identify.exe -ping -format "%%w %%h" "%cd%\%%a"') do set W=%%i& set H=%%j

	rem retrieve image timestamp to perform size and distance calculations on
	SetLocal EnableDelayedExpansion
	for /f "tokens=1-2 delims=" %%k in ('identify -format "%%[EXIF:DateTimeOriginal]" "%cd%\%%a"') do set timestamp=%%k

	rem set timestamp to no timestamp if there is no timestamp
	if "!timestamp!" == "" (
		set timestamp=No timestamp
	)

	rem print some information about the process
	echo %%a is !W! x !H! stamp !timestamp! ...

	rem set timestamp size to a fourth of the screen width
	set /A timestampsize = !W! / 3

	rem set timestamp offset distance from side of the screen
	set /A timestampoffset = !W! / 20

	rem set timestamp outline relative size
	set /A outlinewidth = !W! / 600

	rem echo !timestampsize! !timestampoffset!

	rem create a custom image with the timestamp with transparent background and combine it with the image
	convert.exe ^
	-verbose ^
	-background none^
	-stroke !fontoutlinecolor! ^
	-strokewidth !outlinewidth! ^
	-font !fontstyle! ^
	-fill !fontcolor! ^
	-size !timestampsize!x ^
	-gravity center label:"!timestamp!" "%cd%\%%a" +swap ^
	-gravity southeast ^
	-geometry +!timestampoffset!+!timestampoffset! ^
	-stroke !fontoutlinecolor! ^
	-strokewidth !outlinewidth! ^
	-composite "%cd%\stamped\%%a"

	endlocal
	endlocal
	echo.
)
endlocal
echo Complete!
pause
More info
I also wrote a VBScript version of this operation as well but It would have a lot of black windows popping up being quite annoying.
Unfortunately hiding windows gets trickier when using VBScript when you also need to retrieve the return value from command line utilities.
If you want to check out the vbscript anyway you can still get it here (mirror) (git)
HTML image gallery generator using VBScript and ImageMagick
Posted: 23/04/2015 Filed under: Batch & VBScripts, Graphics | Tags: convert, html, image gallery, image gallery generator, imagemagick, low resolution, open source, thumbnails, vbscript 1 CommentUpdate 2015-06-11: Added msdos short paths to (hopefully) avoid unicode character errors
This VBScript will create a very basic HTML image gallery of all image files placed in the same directory as the script.
It generates thumbnails using ImageMagick and links to the original images.
ImageMagick is a free to use open source collection of command line tools for image editing, identifying, manipulation and much more.
Result

Instructions
Option a) – quick
1. Download the script (mirror) together with portable ImageMagick mogrify.exe in this zip file.
MD5: 704945e2e269aa222ea321a9eff0871f
(github)
2. Extract both files in the same folder where you keep the images that you wish to use in your gallery
3. Double click on CreateHTMLImageGallery.vbs to start the procedure.
A black window should pop up showing the image conversion process in ImageMagick. The window will close when the thumbnails have been created and a preview window will open in your browser.
4. When done you should see a folder named thumbs with low resolution copies (thumbnails) of your images inside it.
Option b) – manual
1. Download ImageMagick from the windows portable edition here and place mogrify.exe in the same directory where you place the script. Alternately you can use the file supplied in the download above.
2. Copy and paste the code from below into your favorite plain text editor like notepad, notepad2 or notepad++
3. Save it with whichever name you prefer as long as you end the name with the file extension .vbs for example CreateHTMLImageGallery.vbs.
4. Double click on the script to start the process!
VBScript to copy and paste
'Simple html gallery maker using ImageMagic mogrify.exe
'Written by Nicklas H https://nirklars.wordpress.com

'Updated 2015-06-11

'---DECLARATIONS SECTION---

Set args = Wscript.Arguments
Set FSO = CreateObject("Scripting.FileSystemObject")
Set SHELL = CreateObject("WScript.Shell")

'Get proper current directory
SHELL.CurrentDirectory = FSO.GetParentFolderName(Wscript.ScriptFullName)
'Declare folder to check files in
Set objFolder = FSO.GetFolder(SHELL.CurrentDirectory)
Set colFiles = objFolder.Files

'Declare global variables
Dim OutputFile
Dim OutputFileContent
Dim FirstLineCheck

'You can change this to gallery.html or whatever you wish
OutputFile = SHELL.CurrentDirectory & "\index.htm"
'Change this if you want another thumbnail size or quality
ImageMagicArguments = "-thumbnail 200x -quality 65 -verbose"

'---PROGRAM SECTION---

'Check if a gallery already exists, if so then delete if
DelFile(OutputFile)

'Regular html gallery code stuff, this is just an example
W("<html>")
W("	<head>")
W("	<title>Image Gallery</title>")
W("		<style>  ")
W("		a:link")
W("		{")
W("			text-decoration: none;")
W("			color: black;")
W("		}")
W("		a:visited")
W("		{")
W("			color: black;")
W("		}")
W("		a:hover")
W("		{")
W("			color: red;")
W("		}")
W("		img ")
W("		{")
W("			border-style: solid;")
W("			border-width: 2px;")
W("			margin: 2px;")
W("			padding: 0px;")
W("			}")
W("		</style>")
W("	</head>")
W("	<body>")

' Breakdown of the <img> tag to be pieced together in the loop
ImagePart1 = "		<a href='"
ImagePart2 = "'><img src='thumbs/"
ImagePart3 = "'></a>"

' Go through every file in the folder and create the <img> tag and stuff
For Each objFile in colFiles
	complies = false

	'check file extensions
	if InStr(objFile.Name,".jpg") > 0 then
		complies = true
	elseif InStr(objFile.Name,".png") > 0 then
		complies = true
	elseif InStr(objFile.Name,".jpeg") > 0 then
		complies = true
	elseif InStr(objFile.Name,".gif") > 0 then
		complies = true
	else
		'skip
	end if

	if complies = true then
		W(ImagePart1 & objFile.Name & ImagePart2 & objFile.Name & ImagePart3)
	end if

Next

'Final part of the html code
W("	</body>")
W("</html>")

'Write the file at once to save disk access times
SaveFile()

'Check if imagemagick is there
if FSO.FileExists(SHELL.CurrentDirectory & "\mogrify.exe") then
	'Create folder and launch imagemagick
	MkDir(SHELL.CurrentDirectory & "\thumbs")
	command = Quote(SHELL.CurrentDirectory & "\mogrify.exe") & " -path " & Quote(ShortPath(SHELL.CurrentDirectory) & "\thumbs") & " " & ImageMagicArguments & " " & Quote("*")
	'start imagemagick
	SHELL.run command, 1, true
	'open the gallery in your browser
	SHELL.run Quote(OutputFile), 1, true
else
	msgbox "Unable to create thumbnail images. Please put ImageMagick mogrify.exe in the script folder and retry!"
end if

'---FUNCTIONS SECTION---

'Function to get short msdos path to work with unicode folder names
function ShortPath(myPath)
	ShortPath = FSO.GetFolder(myPath).ShortPath
end function

'Function to put quotation marks around paths
function Quote(this)
  Quote = Chr(34) & this & Chr(34)
end function

'Write a new line in the output file
Function W(strLine)
	'Skip line break on the first entry
	if FirstLineCheck = false then
		OutputFileContent = strLine
		FirstLineCheck = true
	else
		OutputFileContent = OutputFileContent & vbNewLine & strLine
	end if
End Function

'Save the output file
Function SaveFile()
    Set stream = FSO.OpenTextFile(OutputFile, 2, True)
    stream.write OutputFileContent
    stream.close
	OutputFileContent = "" 'Clear memory
End Function

'Create folder until success
function MkDir(myFolder)
	do
		'Fix env strings
		myFolder = translateEnvStr(myFolder)

		Err.Clear
		On Error Resume Next
		if FSO.FolderExists(myFolder) = true then
			exit do
		else
			FSO.CreateFolder(myFolder)
			if ErrorMessage() = false then
				exit do
			end if
		end if
		WScript.Sleep 1000
	loop
end function

'Delete a file if it exists, wait if it doesnt work and retry
function DelFile(myFile)
	do
		'Fix env strings
		myFile = translateEnvStr(myFile)

		Err.Clear
		On Error Resume Next
		if FSO.FileExists(myFile) then
			FSO.DeleteFile(myFile)
			if ErrorMessage() = false then
				exit do
			end if
		else
			exit do
		end if
		WScript.Sleep 1000
	loop
end function

'Function that translates all EnvironmentStrings into real paths from inside a larger string. Lets call it strLargeEES.
function translateEnvStr(strLargeEES)
	'Count the number of % characters in the supplied string. This is done by removing all of the % from strLargeEES and subtract it from the original strLargeEES.
	intCharNum = Len(strLargeEES) - Len(Replace(strLargeEES, "%", ""))

	'Since there are two % signs for each EnvironmentString that means we divide the total number of EnvironmentStrings by...
	intExpandedStringsNum = intCharNum/2

	'Loop through all of the EnvironmentStrings. Because we need to translate each one separately.
	for i = 1 to intExpandedStringsNum
		'Cut out the part to the right of %
		strFirstCut = Right(strLargeEES,Len(strLargeEES)-InStr(strLargeEES,"%"))
		'Cut out the part to the left of %
		strSecondCut = Left(strFirstCut,InStr(strFirstCut,"%")-1)

		'The result from our cutting reveals the first EnvironmentString!
		result = "%" & strSecondCut & "%"
		'We translate this to the real folder by using a shell object
		translated = SHELL.ExpandEnvironmentStrings(result)

		'When we are done we replace the original EnvironmentString with the translated in strLargeEES
		strLargeEES = Replace(strLargeEES,result,translated)
	'Repeat
	next

	'When done return the whole translated string to the function call
	translateEnvStr = strLargeEES
end function
Dynamic DNS instructions and an update “client” VBScript for freedns.afraid.org
Posted: 17/07/2013 Filed under: Batch & VBScripts | Tags: client, dynamic dns, free, guide, how to, howto, instructions, ip-adress, minecraft, server, setup, subdomain, teamspeak, vbscript, ventrilo, visual basic 5 CommentsPlease note that this article is written in a light hearted way in order to appeal to IT novices and/or first time server runners!
Background
Whenever you run a server for your favourite PC games like Minecraft or voip like Ventrilo or TeamSpeak you sooner or later realize that sharing your IP-address just isn’t reliable enough. This is because your internet service provider (ISP) eventually changes your supplied address every now and then. This is due to the system of distributing a limited amount of IP-addresses and reallocate those that are not in use.
You can read more about the protocol that distributes IP’s (DHCP) here and the limitations of the most used IP-address system IPV4 here.
As you may know most websites have a registered domain name representing their company name or subject of interest. These domains are rented in a “first in, first served” manner to anyone by a company called ICANN which was founded in the beginning of the internet. While ICANN itself maintains the root zone it does not directly manage all the connections whenever someone presses enter after typing in an address, these are responded by intermediate service providers via a protocol named the domain name system protocol (DNS).
Now lets get back to the main point of this post; the solution for you trying to run your server!
Registering a subdomain
Instead of renting a complete domain by yourself you may instead look at alternative subdomain services that are free to use. One of these is the popular freedns.afraid.org
This free service has a very large selection of subdomains to choose from. For example your could register the following, (sorry if they’re already taken :D)
- myminecraftserver.anydns.com
- yourclan.epicgamer.org
- yourname.mooo.org
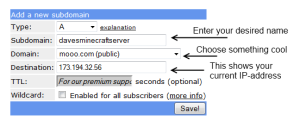
The destination IP-address intentionally points too Google, I won’t be sharing mine!
Keeping your DNS updated
But here’s the thing, in order to keep myawesomeminecraftserver.anydns.com pointing to your IP-address you need to keep it updated and pointing to your current IP-address. In order to do this you need to configure some kind of script or client to check if your IP address has changed at regular intervals.
Instead of using a client or third party program for updating your Dynamic DNS you may prefer to be in total control of the code and actions and use a script similar to the following.
Fortunately freedns.afraid.org supplies an easy way to do this however you wish by supplying a link that you only need to click once in order to redirect the subdomain to your current IP-address. It works like a treat!
To find the link for your domain go here and click the Direct URL link to update your DNS to the current computer.
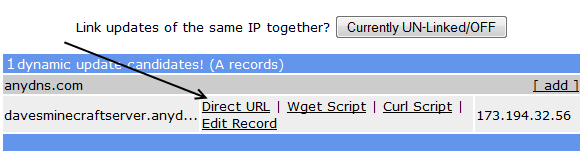
In order to automate this URL in the script below, make sure to copy the full link.
The full link should look something like the following:
http://freedns.afraid.org/dynamic/update.php?herebemanyrandomletters
Please note that I have intentionally removed the random letters.
Scheduling the script
The easiest and most configurable way to make sure that this script runs regularly and in the right intervals according to your needs is to use windows task scheduler.
If you keep the computer that’s acting server constantly online I suggest that you add the condition to Run every day at a certain time.
Please don’t run it too often. Running every hour is too much I think. In regard to the subdomain provider, remember that we want to keep their traffic minimized as much as possible. We want to make sure they can keep delivering their services for free!
If you only keep the computer that’s acting server online when you’re using it (i.e. a travel laptop) I suggest that you also add the condition to Run at system startup and Run when a user logs in
The script
Copy and paste the following code into your favourite text editor or notepad (not MS Word!) and save as DNSUpdateURL.vbs or whichever name you prefer. Or download the script directly. Depending on your browser settings you may have to right click and select “save link as”.
You have to replace the updateURL = “” in settings to your Direct URL link (see above).
Keep the link inside the quotation marks and make sure that there are no accidental spaces at the beginning or the end.
' DNS URL Updater
' By Nirklars

'===================================================================================
'SETTINGS
'===================================================================================

'Change this file name to whichever you prever
logFileName = "DNSUpdateLog.txt"
'Change the path to whereever you prefer
logFileDirectory = "D:"
'This is where you copy and paste your own update url
updateURL = "http://freedns.afraid.org/dynamic/update.php?herebemanyrandomletters"

'===================================================================================
'DECLARATIONS
'===================================================================================

dim localPath, logFilePath

'Find local path where the script run from
localPath = CreateObject("Scripting.FileSystemObject").GetAbsolutePathName(".")

'Declare Log function variables
Dim logFile, oFSO
logFilePath = logFileDirectory & "\" & logFileName

'Declare File System object in order to write to log file
Set oFSO = CreateObject("Scripting.FileSystemObject")

'Declare http object
Set oXMLHTTP = CreateObject("MSXML2.XMLHTTP.3.0")

'===================================================================================
'PROGRAM
'===================================================================================

Log(httpGET(updateURL))

'===================================================================================
'FUNCTIONS
'===================================================================================

'Retrieve a webpage
function httpGET(strURL)
	On Error Resume Next
		oXMLHTTP.Open "GET", strURL, False
		oXMLHTTP.Send
		If oXMLHTTP.Status = 200 Then
			httpGET = oXMLHTTP.responseText ' function return
		else
			httpGET = "http GET failed" ' function return
		end if
		oXMLHTTP.Close
end function

'Write to a logfile
sub Log (msg)
	if oFSO.FileExists(logFilePath) then
		Set oTextFileCheck = oFSO.GetFile(logFilePath)
		'Check if the log file has become larger than 1 mb
		if oTextFileCheck.Size > 1048576 Then
      'If its too large, delete it
			oTextFileCheck.Delete
		end if
	end if

	Set oTextFile = oFSO.OpenTextFile(logFilePath, 8, True)
	oTextFile.writeline date & " " & time & ": " & msg
	oTextFile.close
end sub
(GitHub)
Encrypt your entire Firefox/Thunderbird profile, update
Posted: 29/06/2013 Filed under: Batch & VBScripts | Tags: encrypt, encrypt entire firefox profile, firefox, profile, thunderbird, truecrypt Leave a commentEDIT Please Note! To use this in Windows 8 you need to right click TrueCrypt.exe, go to properties and set it to “run as administrator” and in compatability mode for WindowsXP. You might also need to tune down your UAC settings.
I’ve improved the previous VBScript I wrote for encrypting Firefox and Thunderbird profiles using TrueCrypt.
Please read the previous post for instructions on how to set it up.
The changes from the last to this is an added check for the encrypted drive to avoid error messages when it isn’t found. I’ve also added an automatic string replacement recognition for windows environmental variables.
Almost every line in the code is explained with comments if you wish to dig into it!
You can copy the code from below, paste it into Notepad or your favourite text editor and save it as FirefoxEncrypted.vbs. or download directly. (Depending on your browser settings you may have to right click and select save as)
'User defined settings, EDIT THIS
'---------------------
'Choose a free drive letter
TCLetter = "Q"
'The path to your TrueCrypt installation
TCPath = "%PROGRAMFILES(x86)%\TrueCrypt\TrueCrypt.exe"
'The path to your TrueCrypt file container
TCVolumeFile = "D:\FirefoxProfile.tc"
'The path to your Firefox installation
FirefoxPath = "%PROGRAMFILES(x86)%\Mozilla Firefox\firefox.exe"
'The path to your Firefox Profile
FirefoxProfilePath = TCLetter & ":\Firefox Profile"

'Functions and program, DON'T EDIT THIS
'---------------------

'Declare shell object
set shell = CreateObject("WScript.Shell")
'Declare file system object
set filesys = CreateObject("Scripting.FileSystemObject")

'Function to put quotation marks around paths to avoid space issues and translate EnvironmentStrings
function qPath(vl)
  qPath = translateEnvStr(Chr(34) & vl & Chr(34))
end function

'Function that translates all EnvironmentStrings into real paths from inside a larger string. Lets call it strLargeEES.
function translateEnvStr(strLargeEES)
	'Count the number of % characters in the supplied string. This is done by removing all of the % from strLargeEES and subtract it from the original strLargeEES.
	intCharNum = Len(strLargeEES) - Len(Replace(strLargeEES, "%", ""))

	'Since there are two % signs for each EnvironmentString that means we divide the total number of EnvironmentStrings by...
	intExpandedStringsNum = intCharNum/2

	'Loop through all of the EnvironmentStrings. Because we need to translate each one separately.
	for i = 1 to intExpandedStringsNum
		'Cut out the part to the right of %
		strFirstCut = Right(strLargeEES,Len(strLargeEES)-InStr(strLargeEES,"%"))
		'Cut out the part to the left of %
		strSecondCut = Left(strFirstCut,InStr(strFirstCut,"%")-1)

		'The result from our cutting reveals the first EnvironmentString!
		result = "%" & strSecondCut & "%"
		'We translate this to the real folder by using a shell object
		translated = shell.ExpandEnvironmentStrings(result)

		'When we are done we replace the original EnvironmentString with the translated in strLargeEES
		strLargeEES = Replace(strLargeEES,result,translated)
	'Repeat
	next

	'When done return the whole translated string to the function call
	translateEnvStr = strLargeEES
end function

'Check if the drive already exists (i.e. is already mounted)
if filesys.DriveExists(TCLetter) then
	if filesys.FileExists(translateEnvStr(FirefoxPath)) Then
		'Run another window in firefox
		shell.Run qPath(FirefoxPath)
	else
		msgbox qPath(FirefoxPath) & " is not valid." & vbNewLine & "Please edit the settings!",vbExclamation,"Error!"
	end if
else
	'Arguments to TrueCrypt for mounting of the drive
	'---------------------
	TCMountArgs = " /letter " & TCLetter & " /m ts /volume "
	TCDismountArgs = " /dismount " & TCLetter & " /force /auto /wipecache /quit "

	shell.Run qPath(TCPath) & TCMountArgs & qPath(TCVolumeFile) & " /quit", 1, true

	'Check if the drive was successfully mounted
	if filesys.FolderExists(translateEnvStr(FirefoxProfilePath)) Then
		shell.Run qPath(FirefoxPath) & " -profile " & qPath(FirefoxProfilePath), 1, true
		shell.Run qPath(TCPath) & TCDismountArgs, 1, true
	'else
		'msgbox qPath(FirefoxProfilePath) & " not found!" & vbNewLine & "Did you enter the correct password?",vbExclamation,"Error!"
	end if
	wscript.quit
end if
Here is the same script preconfigured for an encrypted Thunderbird Profile. You can copy and paste this too or get ThunderbirdEncrypted.vbs by downloading directly.
'User defined settings, EDIT THIS
'---------------------
'Choose a free drive letter
TCLetter = "R"
'The path to your TrueCrypt installation
TCPath = "%PROGRAMFILES(x86)%\TrueCrypt\TrueCrypt.exe"
'The path to your TrueCrypt file container
TCVolumeFile = "D:\ThunderbirdProfile.tc"
'The path to your Firefox installation
FirefoxPath = "%PROGRAMFILES(x86)%\Mozilla Thunderbird\thunderbird.exe"
'The path to your Firefox Profile
FirefoxProfilePath = TCLetter & ":\Thunderbird Profile"

'Functions and program, DON'T EDIT THIS
'---------------------

'Declare shell object
set shell = CreateObject("WScript.Shell")
'Declare file system object
set filesys = CreateObject("Scripting.FileSystemObject")

'Function to put quotation marks around paths to avoid space issues and translate EnvironmentStrings
function qPath(vl)
  qPath = translateEnvStr(Chr(34) & vl & Chr(34))
end function

'Function that translates all EnvironmentStrings into real paths from inside a larger string. Lets call it strLargeEES.
function translateEnvStr(strLargeEES)
	'Count the number of % characters in the supplied string. This is done by removing all of the % from strLargeEES and subtract it from the original strLargeEES.
	intCharNum = Len(strLargeEES) - Len(Replace(strLargeEES, "%", ""))

	'Since there are two % signs for each EnvironmentString that means we divide the total number of EnvironmentStrings by...
	intExpandedStringsNum = intCharNum/2

	'Loop through all of the EnvironmentStrings. Because we need to translate each one separately.
	for i = 1 to intExpandedStringsNum
		'Cut out the part to the right of %
		strFirstCut = Right(strLargeEES,Len(strLargeEES)-InStr(strLargeEES,"%"))
		'Cut out the part to the left of %
		strSecondCut = Left(strFirstCut,InStr(strFirstCut,"%")-1)

		'The result from our cutting reveals the first EnvironmentString!
		result = "%" & strSecondCut & "%"
		'We translate this to the real folder by using a shell object
		translated = shell.ExpandEnvironmentStrings(result)

		'When we are done we replace the original EnvironmentString with the translated in strLargeEES
		strLargeEES = Replace(strLargeEES,result,translated)
	'Repeat
	next

	'When done return the whole translated string to the function call
	translateEnvStr = strLargeEES
end function

'Check if the drive already exists (i.e. is already mounted)
if filesys.DriveExists(TCLetter) then
	if filesys.FileExists(translateEnvStr(FirefoxPath)) Then
		'Run another window in firefox
		shell.Run qPath(FirefoxPath)
	else
		msgbox qPath(FirefoxPath) & " is not valid." & vbNewLine & "Please edit the settings!",vbExclamation,"Error!"
	end if
else
	'Arguments to TrueCrypt for mounting of the drive
	'---------------------
	TCMountArgs = " /letter " & TCLetter & " /m ts /volume "
	TCDismountArgs = " /dismount " & TCLetter & " /force /auto /wipecache /quit "

	shell.Run qPath(TCPath) & TCMountArgs & qPath(TCVolumeFile) & " /quit", 1, true

	'Check if the drive was successfully mounted
	if filesys.FolderExists(translateEnvStr(FirefoxProfilePath)) Then
		shell.Run qPath(FirefoxPath) & " -profile " & qPath(FirefoxProfilePath), 1, true
		shell.Run qPath(TCPath) & TCDismountArgs, 1, true
	'else
		'msgbox qPath(FirefoxProfilePath) & " not found!" & vbNewLine & "Did you enter the correct password?",vbExclamation,"Error!"
	end if
	wscript.quit
end if
Minecraft server automatic restarter
Posted: 10/06/2013 Filed under: Batch & VBScripts, Games | Tags: automatic, minecraft, reboot, restarter, server Leave a commentPlease be aware that this is not a fool-proof script! If Minecraft crashes in a way that it keeps running (the process freezes), this script will not work. This is a common occurrence if you are running mods. Also if your world somehow gets corrupted by fatal bugs or memory errors, the script will just keep rebooting endlessly.
This script is divided in two parts. The main START script which keeps the process alive in a loop and a STOP script will stop the loop. The stop script does this by writing a file, telling the main loop to stop. If you accidentally loose or forget the STOP script the only way to stop the loop is by terminating “wscript.exe” from the taskmanager.
You can either copy the code from below and paste it into notepad or your favourite text editor or download the scripts directly.
Please note that the reference to Server Start.bat is a simple batch file containing the following code:
java -Xmx1024M -Xms1024M -jar minecraft_server.jar nogui
START script
Direct download of MinecraftServerLoop-Start.vbs Depending on your browser settings you may have to right click and select save link/target as.
(GitHub)
'===================================================================================
'SETTINGS
'===================================================================================

'Change this to your server launcher
serverFile = "Server Start.bat"

'Change this file name to whichever you prever
logFileName = "MCServerCrashLog.txt"

'Internal wait timer to prevent accidentally overflowing the log file
waitTimer = 2000

'Show more junk while running, only for testing purposes
debugMode = false

'===================================================================================
'DECLARATIONS
'===================================================================================

'Declare Shell object in order to start other programs
set shellServer = WScript.CreateObject("WScript.Shell")

'Declare variables
Dim localPath, crashCount
'Find local path where the script run from
localPath = CreateObject("Scripting.FileSystemObject").GetAbsolutePathName(".")
'Set the application path
appPath = localpath & "\" & serverFile

'Declare Log function variables
Dim logFile, logFSO
logFile = localPath & "\" & logFileName

'Declare File System object in order to write to log file
Set logFSO = CreateObject("Scripting.FileSystemObject")
Set stopCommandFSO = CreateObject("Scripting.FileSystemObject")

If logFSO.FileExists(logFile) Then
	'Delete old log when starting if there is one
	logFSO.DeleteFile logFile
End If

'===================================================================================
'PROGRAM
'===================================================================================

Log "The server started for the first time."

'Master loop
Do
	'Abort the loop if command is saved
	If stopCommandFSO.FileExists(localPath & "\StopLoop.nothing") Then
		Log "The server automatic reboot loop has been stopped."
		stopCommandFSO.DeleteFile localPath & "\StopLoop.nothing"
		wscript.quit
	End If


	'Start the server and wait for it to crash or terminate
	Return = shellServer.Run("CMD /C CD "& localpath & " & """ & AppPath & """" , 1, true)

	'Count number of crashes/restarts this far
	crashCount = crashCount + 1

		'Write to log file
	Log "The server has crashed or restarted. Total " & crashCount & " times."

	'More information
	if debugMode = true then
		WScript.Echo "The server has crashed or restarted. Total " & crashCount & " times since starting."
	end if

	'Internal wait timer to prevent accidentally overflowing the log file
	WScript.Sleep waitTimer
Loop
wscript.quit

'===================================================================================
'FUNCTIONS
'===================================================================================

Function checkProcess(processName)
	'Get list of running processes
	Set colProcessList = GetObject("Winmgmts:").ExecQuery ("Select * from Win32_Process")
	'Go through every item in the process list
	For Each objProcess in colProcessList
		'Return value if process was found
		If objProcess.name = processName then
			checkProcess = True
		else
			checkProcess = False
		End if
	Next
end Function

Function killProcess(processName)
	'Get list of running processes
	Set colProcessList = GetObject("Winmgmts:").ExecQuery ("Select * from Win32_Process")
	'Go through every item in the process list
	For Each objProcess in colProcessList
		'Return value if process was found
		If objProcess.name = processName then
			'Terminate process
			objProcess.terminate
		End if
	Next
end Function

Sub Log (msg)
    Set stream = logFso.OpenTextFile(logFile, 8, True)
    stream.writeline date & " " & time & ": " & msg
    stream.close
end sub
STOP script
Direct download of MinecraftServerLoop-Stop.vbs Depending on your browser settings you may have to right click and select save link/target as.
(GitHub)
'===================================================================================
'DECLARATIONS
'===================================================================================

'Declare variables
Dim localPath, crashCount
'Find local path where the script run from
localPath = CreateObject("Scripting.FileSystemObject").GetAbsolutePathName(".")

'Declare File System object in order to write to files
Set stopCommandFSO = CreateObject("Scripting.FileSystemObject")
stopCommandFile = localPath & "\StopLoop.nothing"

'===================================================================================
'PROGRAM
'===================================================================================

Write "This file will stop the loop."
wscript.quit

'===================================================================================
'FUNCTIONS
'===================================================================================

Sub Write (msg)
    Set stream = stopCommandFSO.OpenTextFile(stopCommandFile, 8, True)
    stream.writeline date & " " & time & ": " & msg
    stream.close
end sub
Dropbox V2.0.22 high cpu usage solution
Posted: 10/06/2013 Filed under: Batch & VBScripts | Tags: 2.0.22, computer resources, dropbox, dropbox low priority, eating up cpu, high cpu usage, new update, performance, run dropbox in lower priority, solution, start in low priority, system startup, too much cpu, workaround Leave a commentUpdate 2016-11-22: After the v14.4.19 Dropbox works differently using a service stored in system32. Changing its priority on launch causes it to shut itself down so this script will not work any more until there is another solution available.
First of all I would like to sincerely thank Dropbox for the service that they offer. It’s a great background app that have worked almost flawlessly in a “set it and forget it” kind of way.
One thing I’ve experienced with the latest release is the apparent increase in CPU usage.
While waiting for a possible configuration option I would like to share a temporary workaround for other people who are also experiencing issues. Please note that this is a Windows only workaround using Visual Basic Scripting Edition (VBScript). Only tested on Windows 7!
This script solution will launch Dropbox in a lowered process priority than usually.
Workaround instructions:
1. Disable system start from the config menu in dropbox
2a. Select and copy the code from below
2b. Or download the script directly. (skip part 3)
3. Paste the code into Notepad or any other plain text editor (not word or wordpad!)
4. Save the document as “DropboxBelowNormalPriority.vbs” in your Start menu Startup folder to make it launch on system startup
Download the script DropboxBelowNormalPriority.vbs directly.
Depending on your browser settings you may have to right click and select save link/target as.
Alternatively copy and paste the code below:
Const NORMAL_WINDOW = 1
Dim oShell, sParams
comSpec = Chr(34) & CreateObject("WScript.Shell").ExpandEnvironmentStrings("%comspec%") & Chr(34)
dropboxPath = Chr(34) & CreateObject("WScript.Shell").ExpandEnvironmentStrings("%ProgramFiles(x86)%") & "\Dropbox\Client\Dropbox.exe" & Chr(34)
cmd = comSpec & " /c start /belownormal " & Chr(34) & "Dropbox" & Chr(34) &" " & dropboxPath & " /systemstartup"
CreateObject("Wscript.Shell").Run cmd,0,True
If you are still experiencing issues try replacing /belownormal with /low by editing the script. Or you can download the script DropboxLowPriority.vbs directly here.
After running Dropbox in below normal priority for about 3 days now I haven’t encountered any problems or missed any syncing! It should work for you as well.
If you encounter any problems please be sure to leave a comment describing the problem!
Encrypt your entire Firefox profile using TrueCrypt!
Posted: 25/10/2012 Filed under: Batch & VBScripts | Tags: encrypt, encrypt entire firefox profile, firefox, open source, prey, thunderbird, truecrypt 1 CommentThis script was updated 2013-06-29! Please get the latest here!
Do you have a habit of carrying your PC laptop or portable hard drive around wherever you go?
Do also prefer to save your passwords in Firefox?
The setup described above is especially bad if your laptop gets stolen. To prepare for such an emergency I would recommend you to continue reading. I also recommend you to try Prey, a way of retrieving your stolpen computer. (It’s open source and uses AutoHotkey scripts)
TrueCrypt
TrueCrypt is an easy to use open source solution for your work related documents and everyday encryption needs. While you may use it to encrypt your entire drive this is a solution which may not work for you or your family if they also use the same computer. There are countless of security setups and software that attempts to solve this problem for you. Some are reliable, some are free and some very costly.
My experience with TrueCrypt is that it has always worked very well, and has been working well for a long time. Some software may go out of date, stop being updated or sold to other sub-par companies. Being open source in this way can be a favor for longevity.
I want to share a simple script that launches TrueCrypt, give you a direct input for your password, mounts your drive and then launches Firefox. When the drive is mounted Firefox loads the profile data from the encrypted drive and keeps the drive mounted until you quit. Simple and useful!
Preparation
- Start up TrueCrypt and follow the guide to create an encrypted file container
- Save the encrypted file container as D:\FirefoxProfile.tc
(this name is an example, you can rename this later) - Manually mount the file you just created to drive Q:\ using TrueCrypt
- Create a new folder and name it Firefox Profile
- Locate your Mozilla Firefox profile folder
- After you have found it copy all of the contents (including subfolders) to your new folder created on the encrypted drive Q:\Firefox Profile
(Remember to shut down Firefox before copying the data or it won’t work properly!) - Delete or preferably shred your original profile folder.
- Manually dismount the volume in TrueCrypt.
- Optional: Rename directories and file names to your liking (also do this in the script file).
- Run the script!
Visual Basic Script (*.vbs)
This will start wscript.exe and keep it running for the duration that Firefox is open. When Firefox closes, it will automatically dismount the drive.
Download the script FirefoxEncrypted.vbs directly.
Depending on your browser settings you may have to right click and select save link/target as.
Alternatively you can copy the code from below, paste it into Notepad or your favourite text editor and save it as FirefoxEncrypted.vbs.
'Declare shell object
set shell = CreateObject("WScript.Shell")

'Function to put quotation marks around paths to avoid space issues
function qPath(vl)
  qPath = Chr(34) & vl & Chr(34)
end function

'User defined settings, EDIT THIS
'---------------------
'Choose a free drive letter
TCLetter = "Q"
'The path to your TrueCrypt installation
TCPath = "%PROGRAMFILES(x86)%\TrueCrypt\TrueCrypt.exe"
'The path to your TrueCrypt file container
TCVolumeFile = "D:\FirefoxProfile.tc"
'The path to your Firefox installation
FirefoxPath = "%PROGRAMFILES(x86)%\Mozilla Firefox\firefox.exe"
'The path to your Firefox Profile
FirefoxProfilePath = TCLetter & ":\Firefox Profile"

'Arguments to TrueCrypt, DON'T EDIT THIS
'---------------------
TCMountArgs = " /letter " & TCLetter & " /m ts /volume "
TCDismountArgs = " /dismount " & TCLetter & " /force /auto /wipecache /quit "

shell.Run qPath(TCPath) & TCMountArgs & qPath(TCVolumeFile) & " /quit", 1, true
shell.Run qPath(FirefoxPath) & " -profile " & qPath(FirefoxProfilePath), 1, true
shell.Run qPath(TCPath) & TCDismountArgs, 1, true

wscript.quit
Further explanation
Windows variables are assigned values for programs to easily find the important system folders in Windows. Here are some examples:
%ProgramFiles% References your C:\Program Files\ folder. This may be different depending on which language pack you are using.
%ProgramFiles(x86)% References your C:\Program Files (x86)\ folder. This only exists on 64 bit windows to store older 32 bit (x86) software.
%AppData% References your C:\Documents and Settings\<User Name>\AppData\Roaming\ folder.
To list all windows variables open up your command console using Run, type cmd /k set and press enter.
You can use this script with Thunderbird as well! Replace the paths and do the same with your Thunderbird profile. I recommend you to create another file container and assign a different drive letter for this, lest closing down either will attempt to dismount the other.
Known issues
This guide assumes that you are running a 64 bit Windows and have both Firefox and TrueCrypt 32 bit versions installed in the default directory paths. If you are running a 32 bit OS like Windows XP or an early version of Windows 7 you will need to remove (x86) from %ProgramFiles(x86)% in the script.
When updating Firefox you won’t be able to restart immediately since this will exit the script. You will have to manually turn it off, remount and then start again.
Post updated 2013-06-10: Rewrote the script and instructions for easier reading and added a direct download of the script. Also I removed the batch script. Who wants to use an ugly batch window? Hope this helps!